| Navigation |
|---|
| HOME |
| RESEARCH |
| TEACHING |
| PAPERS |
| PROGRAMS AND CODE |
| RAPID PROTOTYPING |
| MICROPROCESSORS |
| PICTURES |
| GALLERY |
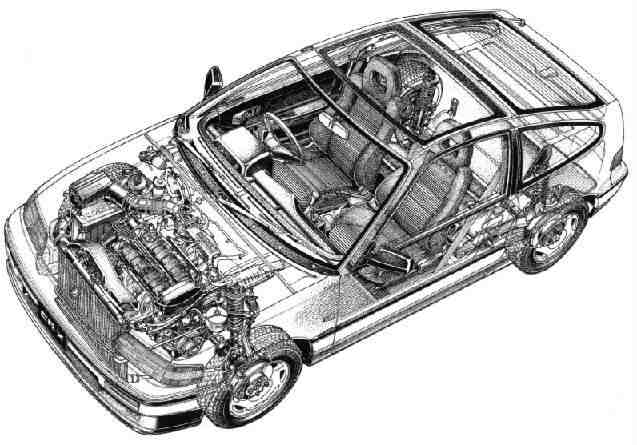
| CRX |
| LINKS |
 =
= 
(Veeeery in-process...obviously:)
Note/Disclaimer: these are in no way intended as professional instructions. Any information you use, implied or explicit you use at your own risk! That being said, I as a student learned to do quite a bit of work on my car, and it saved me thousands of dollars. I also have an incredibly cool family (and friends) who often shares in such adventures, and I have learned much of my handy traits from them. It is great fun! Tuning can preserve one's car (whatever the condition) for a long time with very little cost in comparison to what it costs to have it done. It also gives one more of a sense of one's vehicle. One can hear when it sounds out of tune. Of course, one can go to an expert if there is something potentially dangerous or that you do not have the tools or skills for. I tend to discuss it with the service department of the dealer and some reputable repair shops. They are often a good source of wisdom. PB Foreign in Mission Beach has done good work over the years.
The Honda CRX is a fun little car. Mine is a 91 SI which my sister (and brother in law) practically gave to me as an act of great kindness. It is quite dependable, spunky, and simple to maintain. The repair manuals, parts and web info are everywhere (I'll get some links up at some point). You can also modify this car to the point of being a practically new car, custom to your design. Mine gets on average between 35 and 45 MPG, so it's also inexpensive. I refill my tank once every week or two (though you get more fuel efficiency with a mostly full tank, since you avoid evaporation) and it is only around 6 Gallons down! One other thing to note is that the car can carry a freakishly large amount of stuff into the trunk - I helped several friends move over the years, with only a few trips! I seriously am often taken aback at the sheer size and quantity that it can carry. There's something warm and friendly about the car that invites a good driving experience. I enjoy it and enjoy working on it, and hopefully the info on this page will be interesting to others as well.
Finally, I'd like to say I learned how to work on cars from my Dad. Growing up I always worked with him on our vehicles and it was a great way to enjoy time together and keep things running well. It's a great way to bond with someone, so keep that in mind.
Important notes about working on cars in general:
- Check all torque requirements from the shop manual or the chiltons manual - you'll be surprised how little torque you should use sometimes (and how often people ignore these requirements)!!! I removed a bolt when changing the alternator a while back on an accord and found it was in with over 120 ft-lbs of torque and should only have been in with 12! I had to replace the part entirely.
- Wear nitrile gloves at all times working in the shop - grease and oil are not healthy in the longrun and absorb through your skin so try to minimize how much you get in or on your body. I also suggest long pants and a workshirt, and protective shoes in case you drop something on your foot - be it goo or something heavy. Expect things to get dirty, just try to keep your skin and hair clean, figure on regularly getting rid of trashed clothing.
- I suggest the orange peel-based hand cleaner to clean yourself up after car work. It is non-toxic, inexpensive, and works really well!!! It actually helps remove stains on clothes too!
- Wear eye protection when under the car (at least) - you'll have your eyes a long time, getting grit and junk in them will tend to damage your eyesight over time (or immediately in some cases!). The protective glasses are super cheap on amazon (a few dollars), and are pretty comfortable, and when working under the car, all sorts of junk will fall on you.
- CV-joint replacement - (a case of the right tool for the right job)
- tune-up
- oil change/oil filter replacement
- notes
- do NOT overtighten the drain bolt - it goes into thin sheet metal and it is extremely easy to strip the threads of the hole. Replace the nylon washer periodically to ensure no leakage, and clean it when you do an oil change with WD-40 and a blue shop towel
- it's most convenient to get at the oil filter from under the car. I usually raise the car from the center front lift point, then use jack stands (and chocks - at least wood blocks - behind each rear wheel - don't forget these or the jack stands can drop the car on you!) under each side mount point, and then go in from the front (ie my feet extend from the front of the car, so my head points towards the back)
- if you have trouble with the oil filter in terms of torque use an oil filter wrench, but the all metal ones need some additional friction, so I use an old not too dirty rubber/nitrile glove wrapped around the metal band - works like a charm!
- notes
- spark plug replacement - NGK, do not get the BOSCH platinum plugs or others, as it seems they run the engine at too high a temperature.
- I suggest you get an extension for the socket wrench - the plugs are way down in the valve cover. 6" works for me. I used to pop two 2" ones together because i had them, and they tended to pop apart in the process of removing the plug. It was always a dance of dexterity:) So happy I spent $3. You can get an inexpensive one from NAPA or oreilly autoparts. For example, Part Number: GM8158.
- Get yourself some anti-sieze compound and dielectric compounds when you buy plugs. They cost a few dollars at most, and are very necessary. To use the anti-sieze you put a little on a few of the first threads of the plug before inserting it, and it keeps the plug from jamming later when you change it (heating and cooling repeatedly actually will tend to tighten the plug, and metal-on-metal can also contribute to the plug getting stubborn). Only tighten the plugs to the specs - on the CRX it is not so tight, less than 20ft-lbs. If you don't have a torque-wrench I suggest you get one, but the CRX workshop manual has some approximations such as another 1/8 turn after the base of the plug contacts - in the case of plugs with a spring washer. The dielectric compound - get a few q-tips, and squeeze some on the tip of on - about a pea-sized (like the vegetable) amount. Smear it around the metal connector on the end of the plug wire before popping it back onto the spark plug. This makes a better connection conducting the rather high currents going to the plugs, making your car burn fuel more completely, and thus efficiently (ie better gas mileage, smoother running engine, more power!).
- air filter replace
- Simply remove the four screws holding down the air filter cover. Gently lift it up and out of the way (straight up then rotate). If the screws are rusty some WD-40 is always helpful ahead of time. Take out the old air filter and put the new one in. If there is dirt in the inside of the tube wipe it away with a damp lint-free cloth or towel, be sure not to get any particles in there. I like the blue shop towels from CSK Auto or similar. At this moment it isn't a bad idea to take off the main inlet tube that mounts over the radiator and thoroughly clean it, then replace after using some plastic protectant on the outside (I don't use anything on the inside which could work its way into the engine - better to just clean it with water and a scrub brush lightly. You can also use car washing soap as long as it is properly rinsed out and left to air dry for a while as you do your tune-up.
- timing check/adjustment
- idle check/adjustment
- fuel filter (once in a while)
- oil change/oil filter replacement
- Alternator replacement tips and techniques
- cleaning/detailing tips
- and generally how to wash your car well
- Don't wash your car in the sun if you can avoid it, try to do it in the shade - same with waxing. The water should not be allowed to dry by itself or you get water spots, unless you use special water that dries without spots (I think there are some sprayers which mix chemicals to soften the water). Either way the shade is best - you want your car to be cool also when you wash it.
- I suggest you get a $2 tip for your gardenhose which allows you to not waste water - ie you squeeze a trigger to enable water flow. Also there are several which allow you to adjust the flow for more power or wider spray, etc. Useful.
- Don't wear jeens - or any other clothes that have metal on them, you'll probably scratch your paint. I have some old shorts and a t-shirt, and flip-flops. Expect to take a shower afterwards, and that your feet will get wet.
- Make sure all windows are shut and the doors are shut! This seems obvious but it's good to double check before starting, or you can quickly have a mess before you realize that you have a window open.
- Before washing do the cleaning of the wheels if you have wheel cleaner - use the right one for your wheel type - ie if you have aluminum wheels get an aluminum wheel cleaner, or something safe for aluminum). I use a toilet brush to scrub the wheels - works wonders.
- Start by rinsing the car starting at the top and working your way to the bottom - this makes sure the dirt gets off the car, then when you sponge soap the car you don't grind the paint with dirt and grit from the air and road.
- Rinse the wheels and tires, go over the car a few times - don't let any part dry off at this stage in the air.
- OK, bust out your soap, a bucket, and a good car washing sponge- I use eagle one, but I've used Meguilars, turtle wax, and a few others with various cars. There are some that are ok for the environment and I always try to get those. They key with detailing your car is to try to pick a set of products or brand and stick to them. Each one has different contents, and with wax especially you want to build up a good coat. Different brands may actually 'conflict' with each other like cats and dogs (I know, I know, not all cats and dogs fight, but then again, not all car washing stuff fights:). You'll need a bucket, around 5 gallons - depends on your vehicle's size. Use the recommended mixture of water to soap from the bottle (instructions are always on the container - read them!). First put the soap in the bucket - it's usually like two capfuls or so, then take your hose and use good pressure to spray intensely into the bucket, creating lots of suds. Suds are key here! You really want to foam it up. OK.
- Turn off the water, and soap the car, starting with the top and working your way down again. Use a lot of soap and keep dipping the sponge in the bucket to get dirt off of it. Do the hood and top at least twice as these get more abuse than the other parts of the body. Be sure to get the windows too and your sideview mirrors.
- Do the wheels - people often overlook this, but the soap really helps even if you use products later. I have a toilet brush for scrubbing the wheels instead of using the sponge. Typically I splash water out of the sponge onto the wheel then scrub it
- Did you get it all? OK, now turn on the hose and rinse throroughly all the soap off. Again, top to bottom. Also don't forget the wheels and tires
- Always try to avoid wasting water - use as little as you can of course - a good hose tip helps here because you get more pressure with less actual water volume coming out
- Turn off the hose again. You can dry the windows with a squeegie, that works better than a chamoise and is faster.
- You can use tire cleaner/protectant now, it may be a good idea to have a piece of cardboard to keep any wind from carrying overspray onto your paint and wheels. I often don't go that far but if I'm really wanting detail I do that. Be sure to wipe off any overspray - easier to do when the car is still wet
- Now grab your chamoise and starting with the top use circular motions and very little pressure to soak up the water. Wring it out when it doesn't seem to be grabbing water. Go over the car a few times. Here's where you can use those 'wax as you dry' products. You spray it on before drying, then just dry. It's pretty easy, but not as good of a coat as paste-wax. If you really want a good deep lustre, go with a good paste wax, preferably the same brand as the soap. I use clear, not the colored one.
- If you go with paste wax, use a damp sponge, not the one you washed your car with. It has to be super clean and not dirty at all or dusty, or it will ruin the beautiful shine. Put it on in circular motions ('wax on'), then let it totally dry to a haze. So give it at least 15 min to harden before buffing off. Work on one panel at a time but you can wax the whole car before buffing. When buffing use a super clean preferably soft lint-free cloth. I've used paper shop towels but microfiber towels work well too. Keep changing to fresh parts of the towel as you buff. I don't use buffing machines as they seem harsh on the paint, especially older paint. Hand-done buffing is the best.
- Go over the plastic and rubber parts with a plastic protectant to keep UV from damaging the parts. If you use armor all be sure to keep up with it because it seems that plastic tends to look more dry if you have older armor all on there. I used to have something called 'Black Magic' and it was awsome but haven't found it again, now I typically use armor all. Eagle one has good products too.
- At this point you should have a nice clean shiny car. Admire your work, tell your friends, or just go take a shower and a nap.
- Final notes: Some people believe that you should only have your car washed at a place like a gas station because they filter the water before it drains, keeping harmful chemicals from the environment. It's nice to do that but not all places filter, it costs money (more in the longrun than doing it yourself), and ones that touch your car with rags damage the paint, and then you'll have to repaint your car sooner, which is harder on the environment in the longrun. So if you go with a gas station, I suggest no touch types, and ask them if they filter out the junk before it goes into the drain. Try to get products that are not hard on the environment (or yourself for that matter as there are some toxic chemicals for cleaning cars if you aren't careful - look at brake cleaner for example!), and don't use asbestos brake pads (I think you in general won't have them these days, as they aren't nearly as good as modern materials, but double check when you have your brakes done or do them yourself). Try to wash your car somewhere that has a central processing facility for run-off. This will remove much of the chemicals coming off of your car. Finally, use as little water as possible, don't leave the hose running leaking out water, etc. Water itself is precious.
- muffler replacement -
- I was driving and ran through a very rough section of road, when suddenly my car's exhaust increased volume by quite a few decibels. After inspection, it seemed that the muffler input pipe had disconnected from the muffler at the flange joint between muffler and muffler pipe. It was very rusted, and so was the top of the muffler, so I decided to replace with OEM. I've found that with the rising gas prices, keeping the car running smoothly is key to efficiency. For now I passed up going with a free-flow exhaust performance system. Replacing a muffler is as easy as unbolting two bolts and carefully sliding the two rubber isolation mounts supporting the muffler off. I recommend and honda does as well using a lubricant such as honda lube or simply grease or oil (grease is better of course, but oil is better than nothing in a pinch).
- The reinstallation is a matter of carefully sliding the muffler input pipe over the suspension arm and attaching the two rubber supports. Next and finally the muffler input pipe flange bolts need to be screwed in carefully. Now there's a challenge here. The bolts have springs which need to be compressed in order to be tightened. I found that the position under the car is somewhat awkward so the solution to get enough mechanical advantage is to use a long necked screwdriver with a blunt end (such as one with a hex head) that extends behind the lower suspension arm to provide the compression force on the back of the bolt, then use a ratcheting open-ended wrench to tighten the screw. This worked quite well for me. Do not overtighten the bolts, but snug them down until they bottom and give moderate torque to seat them.
- modifications
- there's a lot out there, but I do have one modification I'm in process on
- Carbon fiber sunroof - I'm about to install this, and boy is it cool looking:) Basically, I can no longer find an original sunroof (at least, not for a reasonable price on ebay, and that is not rusted), and additionally I'm pretty frustrated with the speed at which the original steel one, despite my best efforts to take care of it, manages to rust each time I've replaced it. Carbon fiber will not corrode (rust), so I'm looking forward to this mod. I purchased the top and have opened the package, and so far I'm fairly happy with it. We will see if the holes line up and it mounts easily enough. I'll upload a tutorial and pictures when I have the chance.
- gallery
- references
- Chilton's Honda workshop repair manual - get at a Kragen, a similar store, or online. I've found that no one source of info will have everything, so use many. Each one will give you info about different things, or in different ways
- Honda repair manual - find on the web or purchase
- Chilton's Honda workshop repair manual - get at a Kragen, a similar store, or online. I've found that no one source of info will have everything, so use many. Each one will give you info about different things, or in different ways