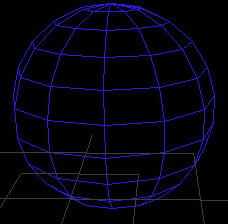
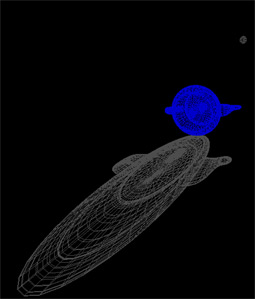
Wireframe
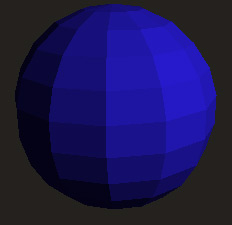
Flat shading
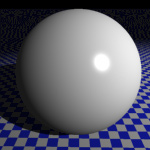
Phong shading
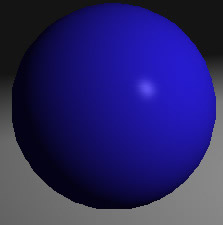
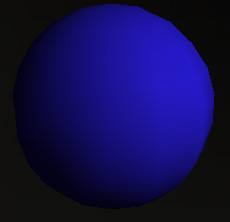
Gourad shading
Over the years there have been many models of the way we see colors and shading (shading models). Many of these have been incorporated into openGL as a tool. Four in particular of interest are wireframe, flat, phong, and gourad shading. Wireframe shading really just represents an object by the outline of its constituent polygons.
|
Wireframe |
Flat shading |
Phong shading |
Gourad shading |
Why is the object made up of polygons? One of the more popular methods of describing the world is by basic geometric primitives, such as two dimensional polygons, usually triangles or rectangles. The advantage of triangles is that three points determine a plane, so you can never have a non-planar polygon. One interesting note regarding triangles describing a visual model of a scene is that Plato, the Greek philosopher believed the universe was actually contructed, at its most basic level of 3-Dimensional triangular shapes. These shapes are now referred to as "platonic solids." Though modern science has a somewhat different perspective from his, platonic solids prove quite useful in 3D modelling, and that primitive type is often included in software packages.
Example: platonic solid
The other kind of modeling which you will be introduced to in this course, but not this project, is spline-based modelling. Frequently this is used for smooth organic shapes.
As part of any material, there are surface aspects which cause the material to reflect light differently. The following are some relevant material surface aspects, and how varying the parameters affects the surface.
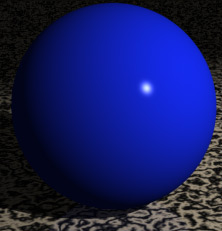
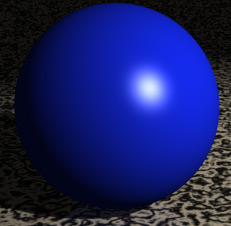
Below is an example of shininess as a value. The sphere on the right is less shiny, with more of what is referred to as a matte surface. The roughness of the surface distributes the light and reflects it in multiple directions, as opposed to keeping the light cohesive.
|
Shininess 100 |
Shininess 50 |
If you want to specify a color for a surface, you can specify different components for the diffuse Red, Green and Blue components.
|
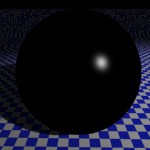
Diffuse {0.0, 0.0, 0.0} |
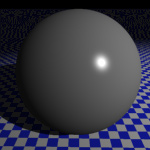
Diffuse {0.5, 0.5, 0.5} |
Diffuse {1.0, 1.0, 1.0} |
In terms of the actual programming, this project will be significantly easier than the previous project. Much of what you need to do for this project is to understand the underlying principles of lighting and shading. To do the basic assignment shouldn't be too many hours.
The actual physics of the way light interacts with, is reflected and refracted off of surfaces is beyond the limitations of current technology to render in realtime. In fact, all models are only windows to reality, separated by an inpenetrable screen, but giving us glimpses into the realities. However, sufficiently convincing results can be obtained by approximations. Wireframe, Phong, or Gourad shading can be rendered in realtime, but raytracing, or following a virtual ray from each light source through the path it would follow to the observer is not. However, raytracing can create nearly photorealistic imagery. Raytracing a room with only one window where light from the sun enters, and no other light sources would yield a dark room with only the floor where the light enters being lit.
In actuality, every object reflects light, and thus acts as a light source. This serves to light up the room, in our room example, because the carpet lights the walls and ceiling, which 'globally' illuminates the room. You can imagine that calculating all the rays of light bouncing off all the objects to the number of reflections and refractions which take place in even the simplest scene is computationally 'prohibitive.' As UCSD students we have access to facilities such as the Supercomputer Center. However there are many people who do not, so a model which approximates this global illumination is called ambient light. Ambient light basically is light which has bounced off so many surfaces it no longer has a specific source ("Ambi-" means varying). Thus a small amount of ambient light is useful in a scene to give a filling in of light. Do not use too high a value, though, or your colors will appear washed out and pale.
To help you create more realistic renderings, here are some common material values to help take some guesswork out of creating good approximations of how various materials behave in terms of their lighting properties. Some of these are not openGL options yet, but are common in 3D modelling and rendering packages, so you may find this table useful in the future.
| (all in %) | Chrome | Glass | Gloss Paint | Rubber | Plastic | Plastic, Clear | Plastic, Shiny | Porcelain |
| Diffuse shade | 20 | 10 | 50 | 75 | 100 | 20 | 100 | 60 |
| specular | 100 | 80 | 30 | 5 | 30 | 100 | 90 | 95 |
| shininess | 100 | 55 | 25 | 0 | 30 | 95 | 50 | 75 |
| metallicity | 100 | 50 | 0 | 100 | 0 | 0 | 75 | 0 |
| glow | 0 | 0 | 0 | 0 | 0 | 25 | 0 | 0 |
| reflectivity | 100 | 20 | 15 | 0 | 0 | 15 | 10 | 25 |
| transparency | 0 | 90 | 0 | 0 | 0 | 100 | 0 | 0 |
| index of refraction | n/a | 1.15 | n/a | n/a | n/a | 1.1 | n/a | n/a |
Using your bouncing ball simulation as a starting point, let us add information by adding a light source and some materials. We will also do some interesting color manipulation, and for extra credit, shadows! We will wait on texture mapping since that has not been covered yet, and you only have a week.
If any of you were not able to complete homework 3a, you may begin with the following starter code. It is essentially what was given in project 3a, collected into one file, with a simple model flying around. If you begin with this starter code, you will have an additional requirement :
1) This seems to be a ghastly difficult assignment at first glance. However, it is mainly using built-in openGL functions, so just follow along, pay attention, and the homework will go smoothly. Begin by duplicating your project 3a folder, and rename it project 3b. You could also copy the code from project 3a, and create a new project 3b project in visual c++, then add the new file. The choice is yours.
2) If you have not done so already, skim the glui manual, glut manual, and look over the example code relating to lighting.
3) Then read the chapter from Dan Olphe's book (Computer Graphics for Engineers and Scientists) on color theory (ch. 3). And finally, please read the chapters in the red book corresponding to color theory and lighting (ch. 4 and 5).
3) Creating the ground plane: There are quite a few ways of doing this. The following is given as one possible way: use a QUAD (four-sided 2D flat surface). The commands for doing this are to specify a color, have a glBegin(...); and then the vertices, then a glEnd(); This goes in your display function, just before the push and pop for the animated bouncing ball.
|
glBegin(GL_QUADS);
glEnd(); |
4)Setting up lighting: Before we add to the function, let us consider that all these lighting values present quite a few variables. We wish to be able to change them with GLUI controls, so we sit back and think, "hmm, how can I do this in a way that is easiest?...". Then suddenly the concept of a typedef comes to mind from project 2. We can encapsulate all the red, green, blue, diffuse, specular, ambient, etc values in a typedef such as LIGHT_TYPE. Then we'll need one for materials as well, so we'll add this also. Let us go ahead and create a typedef for the ambient characteristics in the room as well. So in the global variables area, define a few typedef struct as follows:
|
/* light control variables...
*/
} LIGHT_TYPE;
//declare a variable of type
LIGHT_TYPE; /* material control variables... */
} MATERIAL_TYPE; MATERIAL_TYPE ball;
/*here's our struct for the ambient components. You should make this some low value, otherwise everything will be low contrast and highly bright as the ambient color characteristics (ie, make ambient 1.,1.,1. and the world will look bright white, despite any other lighting characteristics)*/ typedef struct {
} AMBIENT_TYPE; AMBIENT_TYPE ambient; |
In your initGraphics, we'll add calls to create the light source and set it up. This consists of deciding on some ambient light for the scene, setting properties of the light, then turning on lighting and finally turning on the particular light or lights you wish to have on. There are very few commands you actually need in order to use lighting, since openGL has defaults for almost every command. However, there are some things we want to control in order to make the scene render as we wish.
|
//remember that we are adding to your initgraphics code, so your code may look somewhat different. Look for the code //where all the glut callback functions are defined, and add the lighting after those calls. //this will add a small amount
of ambient light to the scene.
ambient.red = 0.2f; /*local or infinite viewing. We change
to local viewpoint (default is infinite). Local viewpoint causes the direction
to be calculated for each vertex. This decreases overall performance but
gives more realistic results*/
/*There are several options we will be leaving out. If you wanted to have both sides (front and back facing) of a polygon lit, ie the inside of the sphere, you would turn on two sided lighting here. This is especially useful if you were allowing the viewer to fly inside the sphere. See the red book, pages 197-210 for more options*/
/*Lets set up the characteristics
of the light source we'll use. Specifically, we'll give it a default position, GLfloat light_position[] = { light0.x, light0.y, light0.z, 1.0f}; light0.diffuse_red = 0.3;
/*Surface normals are important for proper lighting. They must be unit length, and sometimes the projection transformations can cause incorrect normals to be calculated. The following function normalizes all the normals to be of unit length (ie scaled from -1 to 1*/ glEnable(GL_NORMALIZE);
|
5) A detail: At this point, if you compile your program (and fix any little bugs) you should see a lit scene with your bouncing ball shaded gray. If you spin the animation around with the GLUI widget or by clicking in the scene you will notice that the light does not seem to stay stationary relative to the scene (if you look carefully as you tilt the scene, you'll note the ground plane shading changes....that's not quite right!). Recall that we are actually rotating and translating the whole scene relative to the viewer (this is really just a difference in perspective. If you turn your head, your visual system is 'calculating' transformations to understand the rotation. From the perspective of your head, the world is spinning about you - openGL takes your head's position rather than that of the world. You could say it is a 'brainy' approach)
We will solve the issue of the light position by adding one line of code to your display function:
|
void ..... ... .. .
GLfloat light_position[] = {light0.x, light0.y, light0.z,
1.0f};
/*Just to be clear for ourselves,
we'll make a sphere to represent the light source, and put it just above
the actual light*/ /*Your display code for the ground plane should be here*/ |
6) Strangely, it seems that when you scale your scene very large, it gets dark, but when you make it very small, it gets quite bright. It is in fact quite logical. Imagine you are in a dark room, which is small, and you have a small flashlight. It is bright and you can easily shine it on parts of the wall to see some things. That corresponds to our scene as it starts. Now imagine that there is a model of the room, small enough to fit in the palm of your hand. Now the flashlight, which could only illuminate a portion of the wall in the full sized room can illuminate the whole room scene, including the little model of you in the model room. That corresponds to when you scale the scene to be very small. Can you understand why the room gets quite dark when scaled to be titanic?
We could adjust the brightness and falloff of our light source, but this is left to the interested student.
7)GLUI controls for the light: Now you are ready to connect those position and other light characteristic values to some GLUI controls. Go into the InitGlui function, and add a panel. To this panel we will add our controls for the light. Now if you wanted to change the values for multiple light sources, there are various ways to include them all in our glui window. You can exercise some creative freedom here.
Let's save some processor time by calling these changes only when necessary. For example, once we set the color of the light, it doesn't need to change again until we decide that we want to make changes. Every time you make a function call it takes some time for the computer to process. We want our program to be as fast as possible in its execution. Therefore, encase the commands (which are in Display) to make changes to light characteristics in an IF statement. Then create a checkbox called something like "Enable Light Changes' in the glui panel for changes to the light, and use that variable (it will be either one or zero) to bypass the extra calls when we don't need them. We could just leave the checkbox out, but it is best to be as efficient as possible (after all, the computers in the lab aren't exactly 'barn-burners' as the saying goes.
Create controls for the following light characteristics please (control type suggestion is in parentheses):
Light:
- Enable changes (checkbox)
- Specular red (spinner)
- Specular green (spinner)
- Specular blue (spinner)
- Diffuse red (spinner)
- Diffuse green (spinner)
- Diffuse blue (spinner)
- Ambient red (spinner)
- Ambient green (spinner)
- Ambient blue (spinner)
The following three do not need to be inside the if statement, because the transformations of the scene need to apply to the light as well for some sense of realism.
- Position x (spinner)
- Position y (spinner)
- osition z (spinner)
8) Material properties: Great, now consider this: every material type has its own visual properties. This means that what you see perceptually when you look at a wall is not only a function of the light source in the room, but also of the wall. The wall may be drywall, painted with latex paint perhaps, and if you look at that wall at a microscopic level, you would see that it has a certain roughness to the surface. That is part of what determines the diffusivity of the wall (how it scatters light), then the paint color happens to reflect a certain amount of light because of molecular properties. This affects the specular reflection qualities of a surface. Therefore, we could leave these as a default, but let us exercise some control and create a material for the ground, and for the ball which is bouncing, and so on. We already have created a type which contains all the storage of information we want, so let us use it.
One way of doing this, recommended for when you have a simple scene is to just make the calls to set material properties before drawing a particular object. Any object drawn after those calls will have those material properties. This is what we will do since we have several material properties we'll be changing.
A second way, which can be faster as polygons get more complex, and tends to save lines of code is to use glColorMaterial(GLenum face, GLenum mode) function (page 207 in the red book). You can specify various parameters of this function, for the face parameter, GL_FRONT,GL_BACK, GL_FRONT_AND_BACK . For the mode parameter, you can specify GL_AMBIENT, GL_DIFFUSE, GL_SPECULAR, GL_AMBIENT_AND_DIFFUSE, or GL_EMISSION. Then you can specify the ambient and diffuse characteristics of a material by making a glColor3f() call. Any time you make another glColor3f call after that it changes the value for whichever mode you are in. For example, to set the ambient and diffuse values of one sphere to their maximum and another to the middle, we could type:
glColorMaterial(GL_FRONT, GL_AMBIENT_AND_DIFFUSE) ;
...
glColor3f(1.0f, 1.0f, 1.0f);
glutSolidSphere(1., 10, 10);
glColor3f(.5f, .5f, .5f);
glutSolidSphere(1., 10, 10);
PERFORMANCE NOTE: For best performance, use glColorMaterial when you have a single material property you are rapidly changing - for example only diffuse components. Otherwise use glMaterial() when you have less frequent changes or when varying more than one property at a time.
In our case we will use the former method (glMaterial). Similar to the light, we'll tie in the material properties to GLUI visual interface elements. So in display(), we'll add the material calls just before each object is drawn, using variables associated with that object (ie if the ground is modelled as cement, we don't want to make a cement ball...that wouldn't bounce well). Just remember to add to the reset function an initial value for each parameter, for example, ground.specular_red must have some value assigned to it before being used, or else bad things may happen in your program. At the very least it would not work correctly.
|
void Display(void) { //. //.. //... //.. //. GLfloat mat_specular[] = { ground.specular_red, ground.specular_green,
ground.specular_blue, 1. }; //as an example, if we said the following, it would have the properties set above, combined with the light properties glutSolidSphere(3., 10, 10); //. //. //. //.
} |
9) Materials GLUI controls: Now let us tie the material properties to some glui controls. Similar to the light controls, let us group the controls together by creating a panel, then add the following controls at least:
Material
In order to fit all the controls on one glui window, you can do one of the following (they are in the glui manual as to how they are used, one-line code mostly):
OK, now you are done! Congratulations. There is a good deal of theoretical material to absorb here, and several openGL parameters, but worth the effort.
| A compilable program which creates a window with your user name at the title | 30pts |
| A glui window with all controls drawing properly | 20 pts |
| Some form of shading | 20 pts |
| Lighting works appropriately | 10 pts |
| Material properties are assigned to each material | 10 pts |
| Glui controls for lights and materials, turning off/on extra commands | 10 pts |
| Extra Credit | 20 pts |
| Extra extra credit | 20 pts |
| POTENTIAL TOTAL | 140pts |
Create a shadow of the bouncing ball which uses a combination of the ground color and the light color to create an 'accurate' shadow model
Method of Shadow (simple) - Read page 583-4 in the OpenGL Red Book - the section on Shadows
In this method we will simply create a shadow caused by an object obscuring light from a light source, the shadow projecting onto a flat plane. The idea of a shadow is simple, but the technical details for a complete shadow which deforms over any shape can be somewhat daunting. In this simplified model, we will basically compress any 3D object into a 2D plane, and take into account the relative position of the light to the object and the position of the ground. From page 583 in the Red Book, the equation for the ground plane is
ax +by+cz+d=0
Imagine that the light is from an infinite source. Then solving for a line from the source through the object to the ground is as given in page 584 in the red book. In our case we don't have an infinite source, so we need the location of the light source, not just the direction.
Ultimately what we want is a transformation matrix which will take in any three points in the ground plane (counterclockwise order), the location of the light source, and an empty destination global matrix to store the transformation in (4x4). Let us create a few functions, as given in the code below.
| //=======shadow code=============== // Reduces a normal vector specified as a set of three coordinates, // to a unit normal vector of length one. void ReduceToUnit(float vector[3]) { float length; // Calculate the length of the vector length = (float)sqrt((vector[0]*vector[0]) + (vector[1]*vector[1]) + (vector[2]*vector[2])); // Keep the program from blowing up by providing an exceptable // value for vectors that may calculated too close to zero. if(length == 0.0f) length = 1.0f; // Dividing each element by the length will result in a // unit normal vector. vector[0] /= length; vector[1] /= length; vector[2] /= length; }// Points p1, p2, & p3 specified in counter clock-wise order void calcNormal(float v[3][3], float out[3]) { float v1[3],v2[3]; static const int x = 0; static const int y = 1; static const int z = 2; // Calculate two vectors from the three points v1[x] = v[0][x] - v[1][x]; v1[y] = v[0][y] - v[1][y]; v1[z] = v[0][z] - v[1][z]; v2[x] = v[1][x] - v[2][x]; v2[y] = v[1][y] - v[2][y]; v2[z] = v[1][z] - v[2][z]; // Take the cross product of the two vectors to get // the normal vector which will be stored in out out[x] = v1[y]*v2[z] - v1[z]*v2[y]; out[y] = v1[z]*v2[x] - v1[x]*v2[z]; out[z] = v1[x]*v2[y] - v1[y]*v2[x]; // Normalize the vector (shorten length to one) ReduceToUnit(out); } // Creates a shadow projection matrix out of the plane equation // coefficients and the position of the light. The return value is stored // in destMat[][] void MakeShadowMatrix(GLfloat points[3][3], GLfloat lightPos[4], GLfloat destMat[4][4]) { GLfloat planeCoeff[4]; GLfloat dot; // Find the plane equation coefficients // Find the first three coefficients the same way we // find a normal. calcNormal(points,planeCoeff); // Find the last coefficient by back substitutions planeCoeff[3] = - ( (planeCoeff[0]*points[2][0]) + (planeCoeff[1]*points[2][1]) + (planeCoeff[2]*points[2][2])); // Dot product of plane and light position dot = planeCoeff[0] * lightPos[0] + planeCoeff[1] * lightPos[1] + planeCoeff[2] * lightPos[2] + planeCoeff[3] * lightPos[3]; // Now do the projection // First column destMat[0][0] = dot - lightPos[0] * planeCoeff[0]; destMat[1][0] = 0.0f - lightPos[0] * planeCoeff[1]; destMat[2][0] = 0.0f - lightPos[0] * planeCoeff[2]; destMat[3][0] = 0.0f - lightPos[0] * planeCoeff[3]; // Second column destMat[0][1] = 0.0f - lightPos[1] * planeCoeff[0]; destMat[1][1] = dot - lightPos[1] * planeCoeff[1]; destMat[2][1] = 0.0f - lightPos[1] * planeCoeff[2]; destMat[3][1] = 0.0f - lightPos[1] * planeCoeff[3]; // Third Column destMat[0][2] = 0.0f - lightPos[2] * planeCoeff[0]; destMat[1][2] = 0.0f - lightPos[2] * planeCoeff[1]; destMat[2][2] = dot - lightPos[2] * planeCoeff[2]; destMat[3][2] = 0.0f - lightPos[2] * planeCoeff[3]; // Fourth Column destMat[0][3] = 0.0f - lightPos[3] * planeCoeff[0]; destMat[1][3] = 0.0f - lightPos[3] * planeCoeff[1]; destMat[2][3] = 0.0f - lightPos[3] * planeCoeff[2]; destMat[3][3] = dot - lightPos[3] * planeCoeff[3]; } |
It is left up to the student to spend some time thinking about how this code works. In order to implement it, you must paste it into your program, fix any bugs (hint, if you get problems with the 'bool' statement, make it a capital BOOL - platform difference causes this error), and make an appropriate group of calls:
In order to use the transformation matrix it must be built, so make a call (each time you want to recompute the matrix- ie when the light moves, but first in your initgraphics code). Then draw your ground as before, and your object, but add another glPushMatrix() and glPopMatrix(). Inside those calls you need to add the shadow transformation matrix by doing a glMultMatrix as follows:
glMultMatrixf((GLfloat *)shadowMat);
Then transform and rotate your object, and next draw it. You will need to also add to the z-transform a particular value in order to put the shadow in the correct location (super hint, it has to do with the height of the object!!!!).
You now need to do a few things to make this look like a shadow. First, before your transformation matrix you need to turn off lighting and turn off depth testing:
glDisable(GL_DEPTH_TEST);
glDisable(GL_LIGHTING);
This prevents z-fighting, which was lectured on in class. If you missed that detail, go read about it in the red book, as there is some info there, otherwise spend some time online. Z-fighting happens when two objects are trying to be drawn in the same place at the same time. You may get them fighting each other for who gets drawn. Leads to ugly things happening in your image.
Don't foget to turn lighting and depth testing back on in your display code after drawing the shadow!
Finally you need to create some color which is a combination of the light color and ground color. You could use alpha blending since that has been lectured on, or you could do the math yourself, add the color components together and divide by some amount to make the shadow somewhat muted in appearance.
Here's an example with lighting turned off:
Reference: OpenGL Superbible, Second Edition Richard S. Writght, Jr. and Michael Sweet (pp 219-222)
Allow the light source to be distant, point, or spot by a GLUI menu
Add the rotation equations to the bounce. Since we are now shading the ball, we want to know if it is rotating. Come up with some creative way to make it obvious graphically how the ball is rotating (ie, before we put a cube inside the ball, since a cube has edges which are clear when spinning).
Equations TBA in section on thursday - 3:30pm. Keep checking website.