MAE 152 -- Fall 2003
Project 3a: Bouncing ball simulation: Window into the virtual
world
Due date: Fri. Nov. 7, 2003, 5pm
100 Points with 20 points extra credit

Last edited Nov. 6, 2003
Objectives: (extra credit now posted)
This project introduces some of the more compelling
aspects of openGL - 3D and animation!!!
- Learn the principles of basic animation, including timing
events to be triggered after a specified duration
- Learn to control how an object is represented on the screen
- Understand rotation, transformation and scaling matrices
- Develop graphical user interfaces
(GUI's--pronounced "gooey") to allow extensive user feedback and
interaction with the program
Project Definition:
Discussion
Physical simulation coupled with computer
graphics and the virtual world is becoming an increasingly common application
for mechanical engineering. This is applied to everything from entertainment
to pre-prototype testing of buildings, public transportation systems, and other
advanced technologies. OpenGL has the advantage of allowing all this to happen
in real-time.
We are going to create a simulation of an impulsive
collision (ie occurring over a very short time) between an elastic ball
and a frictionless plane.
There are many levels of complexity at which to
simulate, as well as numerical strategies for integrating the underlying differential
equations. In this case, the numerical integration will be at a simple level
- euler integration, and the simulation will include the impulse of the
collision combined with gravitational effects.
Consider a brief review of impulsive force and
euler integration. With impulse it is sometimes confusing to imagine an instantaneous
change in velocity. As you ponder impulse, you suddenly remember a childhood
memory. It is an intense game of tag on the playground (Those of you who have
never played tag really REALLY missed out). You are being chased by your friend,
who is "it." Your game has suffered today because you are still trying
to understand the concept of impulse. As you are thinking about this, you glance
back to realize your friend is quickly overtaking you. It is at that unfortunate
moment that you make the unfortunate decision to turn, at the same moment another
individual in the game running from the other direction turns...BANG!!!
While lying on the ground stunned from your "collision,"
you realize suddenly what instantaneous change in velocity means, and impulsive
force makes sense to you. You are so excited that the rest of the day is spent
in the nurse's office, since you answered the question of what your name is
as "Instantaneous change in velocity."
Consider the equation of y' = f(t,y), where
y' = dy / dt. Euler integration is a simple numerical integration scheme
by which our function f() is sliced up into a finite number of rectangular slices,
all of the same width (explicit euler integration) dt = t[n+1]-t[n]. Then
we can find
y[n+1] = y[n] +dt * f( t[n], y[n] )
In our case we are dealing with f(t,y) as being
velocity, with vectors components in each direction, and position in X, Y, Z.
In the case of our program, dt will be 1/30 of a second, or about 33msec.
or 0.033sec. You will use this to step through your animation, 33 msec at a
time.
The changes over time are displayed as a sequence
of still frames to create the illusion of motion. This is called photoscopic
motion Photoscopic motion is what you see when you watch television, see
a movie, use a computer, or play video games (unless you are very "old
school" and play text-only games!). Photoscopic motion returns us to the
concept of a gestalt, as well as our perceptual limitations.

Figure 1: Example of photoscopic motion
Take a moment to consider all of the times during
the day when you see or perceive motion. It appears that your perception is
continuous, ie a car driving by, frisbee flying through the air, or a wave crashing
in the ocean all are experienced in a smooth motion. The fact is that your perception
is not continuous. As an example, each and every person has a hole in their
vision (blind spot) on their retina where the ocular nerve attaches at the back
of your eye. But you do not walk around seeing a black hole in your vision.
Instead your brilliantly put together brain fills in the unknown information
from various sources. The same happens with motion perception. After a frequency
of around 24-30Hz (Thirty times per second), the perception of a discrete
change from one point to another (or one image to another) is seen as a smooth
transition. That is why you can watch television without seeing a sequence of
flashing still frames (that would be extremely disturbing!). Television is broadcasted
at 29.97Hz, which is referred to as 'drop-frame' rate. In fact, the number
of frames displayed per second is referred to as the frame rate. Animation
is merely the drawing of a sequence of frames, one after the other, in which
an object or scene has some sort of progression through motion or other change
(color, for example). This must be timed in order to convey some movement with
a particular velocity. If your computer is able to display the frames faster
than the animation is intended to be displayed, and no timing is implemented,
the animation would race by in the blink of an eye.
The other two aspects to this project will be
a graphical interface and multiple camera views. The GUI allows
the user to give the ball different initial velocities and positions, as well
as providing animation controls and viewing controls. The multiple camera views
will illustrate how different points of view can elucidate entirely new interpretations
of the same information. Below is a sample GUI created using the GLUI
library:
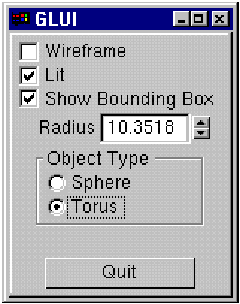
Figure 2: Sample GUI: Top to bottom- 3 checkboxes,
1 spinner (editbox), one object group containing two radio items, one button
Anyone who has written programs for Microsoft
Windows, Unix, MacOS, or any other operating system know that creating even
a simple graphical user interface can be an extremely time consuming and involving
process. This detracts from the time one wishes to spend on the important aspects
of the program. The GLUI library
(or download the library and required files
here) (which uses GLUT to display windows and functional interface elements)
is designed for the express purpose of creating interfaces with the greatest
of ease- almost all interface elements (button, checkbox, etc.) require only
one line of code to be added, and all the rest is taken care of for you! There
are also other libraries which can be found that do something similar, but the
simplicity of GLUI is difficult to match, and it fulfills all our interface
purposes for this course.
Assignment:
The project is as follows. Create a simulation
of a sphere being dropped from some initial height, and some initial velocity
(including rotation), including the sphere bouncing and losing energy. Let the
sphere be displayed as a wireframe with some shape (such as a cube) inside it
of a solid color. Provide a graphical user interface which will allow the user
to perform the following graphically:
- Reset the animation
- Turn it off and on
- Adjust the coefficient of restitution (explained in the
theory review)
- Scale the animation view
- Translate the animation x-y
- Translate the animation z
- Quit
- Step through the animation
- Change between perspective and orthographic views
- Provide a debug checkbox to turn on debugging (ie print
out text to the console window using fprintf statements)
Allow the user to click inside the drawing area,
and rotate or scale the scene.
There are many ways to approximate the collision
of the ball with the ground. Since the ball-ground collision is over a very
short period of time, we will use an impulse force calculation to perform our
simulation. For a complete review of collision from your earlier coursework,
refer to your statics/dynamics book(s) (ie Vector Mechanics for Engineers:
Statics and Dynamics, Beer and Johnston, sixth edition or later). You will
find a chapter covering impact and collision (at least one). A brief overview
of the theory is provided for you. We will assume a frictionless surface (see
extra credit for inclusion of rotation and friction)
Hints (steps to a successful project):
Warning!!!! Don't let this be you!!!
Please read and follow instructions!!!

1) If you have not done so already, read the brief
discussion above. Do not skim it, questions may be
derived from this discussion for your test! Besides, it is important information.
2) Read through the glui
manual pdf file from beginning to end. You aren't expected to understand
everything, but it is worthwhile reading. It is only 28 pages long and will
make your assignment go faster with many less "hicups."
3)For practice, we will start again by creating
a new project. Just in case any of you are still having some confusion doing
this with Visual C++, we're going to explain this mainly graphically, in honor
of our discussion of GUI's.. Just follow along in Visual C++ (if that is your
development environment of choice here):
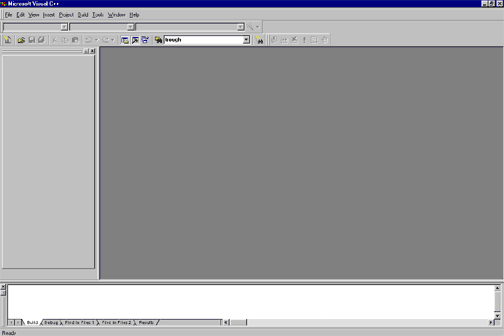
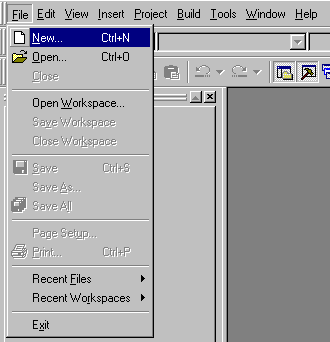
a) Open Visual C++ from the start menu. You
should see something like the following:
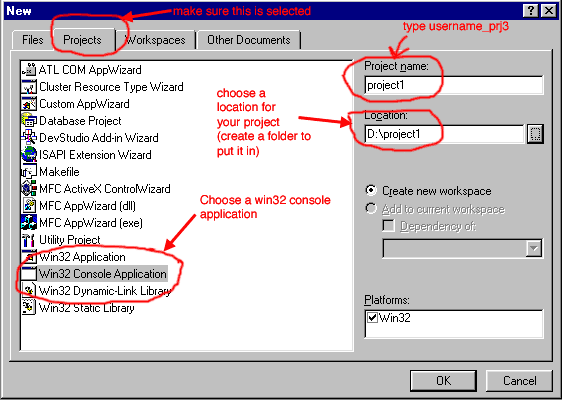
b) Let's create a new project:
c) Create the project
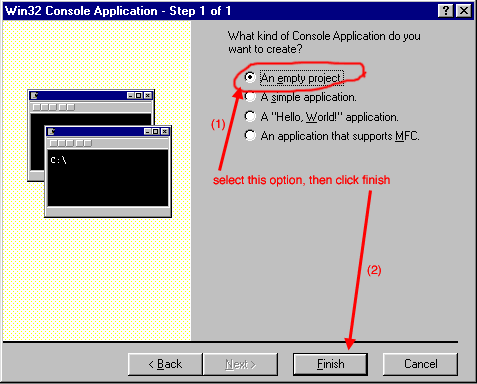
d) Make sure to select 'empty project'
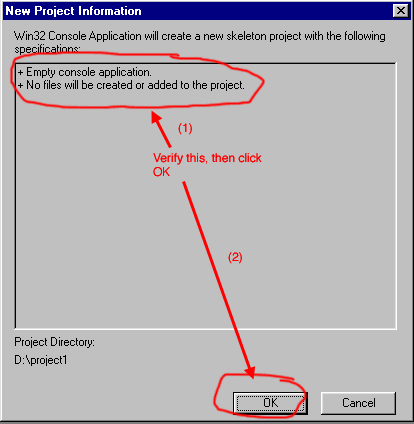
e) You should see the following information
window
f) The project should now be open in Visual
C++. We still need to add the file that will contain our source
g) We can at this point add a pre-existing file
or create a new one
h) Make sure to click the file tab, then create
a new C++ file, save it to the same folder as your project, and be sure to add
it to the project.
i) Now we need to change some settings to let
us use openGL calls in our code
j) Make sure 'all configurations' is selected,
then go to the 'link' tab, and add to the object/library modules the three libraries
'opengl32.lib glu32.lib glut32.lib glui32.lib' separated by spaces only, NOT
commas.
The rest is coding.
(for all future projects, you may find this tutorial to get
to an empty project created in Visual C++ ready for openGL in the handouts area)
4) We will use some of the same functions used
in the previous homework. These functions will be provided for you as we go
in this assignment. Any code will be italicized and inside a box, so to be clear
what is code and what is not. Let's start with our empty file. Be sure it is
open. If not, open your project (if it is not open in Visual C++) and double
click your cpp file from the file list, as in figure 'f' above.
In order to get the most out of this next group
of hints, please read each code box and description through before copying and
pasting it into your project. The code is given to you in this fashion so you
can try to understand each function as much as possible as you go.
Please also do the following after pasting
each section in place in your code :select all the code by typing ctrl-A, then
go to edit-advanced-format selection to properly format the code's appearance.
We need to first include some header files:
|
/*The standard libraries for C and
extra math (we'll be needing some sines and cosines possibly) here*/
#include <stdio.h>
#include <math.h>
/* These are the openGL and
GLUI calls. Notice that we only call glut, not gl and glu. Glut has these
calls inside it!*/
#include <GL/glut.h>
#include <GL/glui.h>
|
This, combined with adding the libraries to our
project in the project settings, enables openGL calls in our application. If
something is wrong here, you will probably get some link errors when you try
to call opengl functions.
5)We'll need various constants in this program,
so go ahead and add them now :
|
#define M_PI 3.14159265
/* title of these windows: */
const char *WINDOWTITLE = { "Bouncing cube animation, Bartholemew_prj3"
};
const char *GLUITITLE = { "User Interface Window" };/* what
the glui package defines as true and false: */
const int GLUITRUE = { true };
const int GLUIFALSE = { false };
/* the escape key: */
#define ESCAPE 0x1b
/* gravity */
#define GRAVITY 9.81 // meters/second^2
/* initial window size: */
const int INIT_WINDOW_SIZE = { 800 };
/* multiplication factors for input
interaction: */
/* (these are known from
previous experience) */
const float ANGFACT = { 1. };
const float SCLFACT = { 0.005f };
/* minimum allowable scale factor:
*/
const float MINSCALE = { 0.05f };
/* active mouse buttons (or them together):
*/
const int LEFT = { 4 };
const int MIDDLE = { 2 };
const int RIGHT = { 1 };
/* which projection: */
const int ORTHO = { GLUIFALSE };
const int PERSP = { GLUITRUE };/* which button:
*/
#define RESET 0
#define QUIT 1
/* window background color (rgba):
*/
const float BACKCOLOR[ ] = { 0., 0., 0., 0. };
/* color and line width for
the axes: */
const float AXES_COLOR[ ] = { 1., .5, 0. };
const float AXES_WIDTH = 3.;
/* handy to have around: */
const int OFF = { 0 };
const int ON = { 1 };
#define FALSE 0
#define TRUE 1
/* convenient way to square and cube
a number: */
inline int SQR( int x )
{
return x * x;
}
inline float SQR( float x )
{
return x * x;
}
inline int CUBE( int x )
{
return x * x * x;
}
inline float CUBE( float x )
{
return x * x * x;
}
|
6)Now let's create a couple of sections: non-constant global
variables, and our function prototypes. Realize this is just a starter list,
and you will add to them as necessary.
|
/**
** non-constant global variables:
**/
int ActiveButton; /* current
button that is down */
int AxesList; /* list to hold the axes */
int AxesOn; /* ON or OFF */
int Debug; /* ON means print debug info */
GLUI * Glui; /* instance of glui window */
int GluiWindow; /* the glut id for the glui window
*/
int GrWindow; /* window id for graphics window */
int Objectlist; /* object display lists */
float RotMatrix[4][4]; /* set by glui rotation widget
*/
float Scale,Scale2; /* scaling factors */
int WhichProjection; /* ORTHO or PERSP */
int Xmouse, Ymouse; /* mouse values */
float Xrot, Yrot; /* rotation angles in degrees
*/
float TransXYZ[3]; /* set by glui translation widgets
*/
int computed_collision;/* collision just computed,
prevents repeated collision calcs */
int anon=1;
int keyon=1;
float t=0.0f;
float X,Y,Z;
float Thetax, Thetay, Thetaz;
float mass = 10.0f;
float one_over_mass; /*Compute
this once, and then we'll save some processor time*/
float Ia ;
float CMToCorner_PerpA[3];
float collision_normal[3];
float linear_Velocity[3];
float angular_Velocity[3];
int STOPPED = 0; /*stops the animation if you are
too close to zero in height and too slow in vel*/
int MOTION ;
int tempsomething;
float g_radius=0.15f;
/* The coefficient of Restitution
*/
float COEFFICIENT_OF_RESTITUTION =0.9f;
/*===================*
** function prototypes:
*===================*/
void Animate( void ); /*
All of our animation code will go here, including the calculations of
impulsive collisions*/
void Buttons( int ); /*
a glut callback we will fill up with a switch statement as to what happens
with a button press*/
void Display( void ); /*
good old friend the display function callback*/
void InitGraphics( void ); /*
initializes graphics*/
void InitLists( void ); /* initializes
display lists*/
void InitGlui( void ); /* calculates the
triple integral of the differential-complex-fourier-laplace-cosine...initializes
glui*/
void Keyboard( unsigned char, int, int ); /*
our keyboard callback function, just like project 2, a switch statement
for key presses*/
void MouseButton( int, int, int, int ); /*
handles mouse clicks with the left, middle or right button, glut callback
function*/
void MouseMotion( int, int ); /* handles mouse tracking
and positioning, a glut callback function again*/
void Reset( void ); /* this will serve
to reset the animation and various numbers*/
void Resize( int, int ); /*
handles window resizing, works the same as with project 2*/
void cross( float [3], float [3], float [3] ); /*
calculates the cross product of two vectors, and puts the output in the
third*/
float dot( float [3], float [3] ); /*
returns the scalar dot product of two vectors*/
float unit( float [3], float [3] ); /*
normalizes the input vector to one, fills the second vector as the normalized
input*/
void scalarproduct(float [3], float ,float [3]); /*
takes the scalar product of a vector and a scalar and fills the third
variable (vector)*/
int CheckCollision(float,float,float); /*
checks if a collision occurs at a particular x,y,z*/
float norm(float [3]); /* computes the norm of the
input vector*/
float distance(float [3],float [3]); /* computes
the distance between two vectors*/
void myTimer(int); /* a timer function glut callback,
will be triggered every so often*/
|
7) Now it is time to create the main program function. We will
do all the initialization and then registration of callbacks, then go into the
glutmainloop as before.
|
int main( int argc, char *argv[] )
{
/* Initalize OpenGL Toolkit */
glutInit( &argc, argv );
/* setup all the graphics stuff, including
registering event callbacks with glut*/
InitGraphics();
/* create the display structures that
will not change: */
InitLists();
/* init all the global variables used
by Display(): */
/* this will also post a redisplay */
/* it is important to call this before InitGlui(): */
/* so that the variables that glui will control are correct */
/* when each glui widget is created*/
Reset();
/* setup all the user interface stuff:
*/
InitGlui();
/*------------------------------------------------------------------
Call OpenGL main loop. This function does not return until
the graphics window is closed or destroyed.
------------------------------------------------------------------*/
glutMainLoop();
/* this is here to make the
compiler happy: */
return 0;
}
|
8) Good, now we need to fill in all the functions. First, we'll
start with InitGraphics(), which initializes all our callbacks, creates our
main window, and sets up some parameters for our animation. Look through this
function. For more information about each function call, go to the glut manual
|
/**
** initialize the glut and OpenGL libraries:
** also setup display lists and callback functions
**/
void
InitGraphics( void )
{
if( Debug )
fprintf( stderr, "InitGraphics\n" );
/* setup the display mode: */
/* ( *must* be done before
call to glutCreateWindow() ) */
/* ask for color, double-buffering, and z-buffering: */
glutInitDisplayMode( GLUT_RGBA | GLUT_DOUBLE | GLUT_DEPTH
);
/* set the initial window configuration:
*/
glutInitWindowSize( INIT_WINDOW_SIZE, INIT_WINDOW_SIZE
);
/* open the window and set its
title: */
GrWindow = glutCreateWindow( WINDOWTITLE );
glutSetWindowTitle( WINDOWTITLE );
glutPositionWindow(400, 40);
/* setup the clear values: */
glClearColor( BACKCOLOR[0], BACKCOLOR[1],
BACKCOLOR[2], BACKCOLOR[3] );
/* setup the callback routines: */
/* DisplayFunc -- redrawthe window
*/
/* ReshapeFunc -- handle the user resizing the window */
/* KeyboardFunc -- handle a keyboard input */
/* MouseFunc -- handle the mouse button going down or up */
/* MotionFunc -- handle the mouse moving with a button down */
/* PassiveMotionFunc -- handle the mouse moving with a button up*/
/* EntryFunc -- handle the cursor entering or leaving the window */
/* SpecialFunc -- handle special keys on the keyboard */
/* SpaceballMotionFunc -- handle spaceball translation */
/* SpaceballRotateFunc -- handle spaceball rotation */
/* SpaceballButtonFunc -- handle spaceball button hits */
/* ButtonBoxFunc -- handle button box hits */
/* DialsFunc -- handle dial rotations */
/* TabletMotionFunc -- handle digitizing tablet motion */
/* TabletButtonFunc -- handle digitizing tablet button hits */
/* MenuStateFunc -- declare when a pop-up menu is in use */
/* IdleFunc -- what to do when nothing else is going on */
/* TimerFunc -- trigger something to happen every so often */
glutSetWindow( GrWindow );
glutDisplayFunc( Display );
glutReshapeFunc( Resize );
glutKeyboardFunc( Keyboard );
glutMouseFunc( MouseButton );
glutMotionFunc( MouseMotion );
glutPassiveMotionFunc( NULL );
glutEntryFunc( NULL );
glutSpecialFunc( NULL );
glutSpaceballMotionFunc( NULL );
glutSpaceballRotateFunc( NULL );
glutSpaceballButtonFunc( NULL );
glutButtonBoxFunc( NULL );
glutDialsFunc( NULL );
glutTabletMotionFunc( NULL );
glutTabletButtonFunc( NULL );
glutMenuStateFunc( NULL );
// DO NOT SET THE GLUT IDLE FUNCTION
HERE !!
// glutIdleFunc( NULL );
// let glui take care of it in InitGlui()
/*But we will set our timer function
here:*/
glutTimerFunc( 33, myTimer, 1 );
}
|
9) Now we'll create the initlists function to initialize our
object lists. Object lists can hold opengl commands, as well as create precompiled
shapes like 'legoman' or 'car' that you can draw just by calling the list name.
For now leave this function empty, but for extra credit you can fill it according
to extra credit requirements.
|
void InitLists( void )
{
if( Debug )
fprintf( stderr, "InitLists\n" );
}
|
10) Here is one of the significant new learnings
of this homework: How to use GLUI interface elements. You read the glui
manual already, but here's most of the interface you will need for your
project, and the code to do it. Glui is using GLUT to create for you most of
the interface elements you are used to. Unfortunately it is written with the
C++ convention for some calls and variables, but if you follow the examples
below, you should be able to create any GUI you need with your current knowledge.
We can explain the different format to you if you have questions, however.
|
/**==============================================
/ ==============================================
** initialize the glui window:
/ ==============================================
**============================================*/
void InitGlui( void )
{
if( Debug )
fprintf( stderr, "InitGlui\n" );
/*==================================================
These are the Glui pointer variables identifying the panels
and translation group
===================================================*/
GLUI_Panel *panel, *bigpanel;
GLUI_Translation *trans, *scale;
/*=============================================
GLUI_Master.create_glui creates a new glui
window with the title as an argument. We
defined the title above as a #define
===============================================*/
Glui = GLUI_Master.create_glui( (char *) GLUITITLE);
/*================================================
Add static text in the order called
by making the following one line call:
================================================= */
Glui->add_statictext( "This will add static text" );
/*==================================================
Add a separator by making the following line of code:
====================================================*/
Glui->add_separator();
/*==================================================
Add a checkbox by making the following line of code:
====================================================*/
Glui->add_checkbox( "Perspective",
&WhichProjection );
/*==================================================
Add a 'panel' of controls with the name as the
argument, by making the following line of code:
====================================================*/
bigpanel = Glui->add_panel( "Controls"
);
/*==================================================
You can add controls to the panel group which has
been created with slightly different calls to create
the control. Checkbox example is below
arguments:
(which panel to add to),(checkbox title),(variable)
====================================================*/
Glui->add_checkbox_to_panel(bigpanel,"Animation on",&anon);
Glui->add_separator();
/*=====================================================
add a new column of controls so they aren't all in a
vertical line here
=====================================================*/
Glui->add_column_to_panel( bigpanel, TRUE
);
/*====================================================
The transformation widgets panel is given to you below
======================================================*/
panel = Glui->add_panel( "Object Transformation"
);
Glui->add_rotation_to_panel( panel, "Rotation", (float
*) RotMatrix );
Glui->add_column_to_panel( panel, FALSE );
scale = Glui->add_translation_to_panel( panel, "Scale",
GLUI_TRANSLATION_Y , &Scale2 );
scale->set_speed( 0.01f );
Glui->add_column_to_panel( panel, FALSE );
trans = Glui->add_translation_to_panel( panel, "Trans XY",
GLUI_TRANSLATION_XY, &TransXYZ[0] );
trans->set_speed( 0.1f );
Glui->add_column_to_panel( panel, FALSE );
trans = Glui->add_translation_to_panel( panel, "Trans Z",
GLUI_TRANSLATION_Z , &TransXYZ[2] );
trans->set_speed( 0.1f );
/*=====================================================*/
/*a checkbox for debugging*/
Glui->add_checkbox( "Debug", &Debug );
/*=====================================================
to add a panel with no border, type either
GLUI_PANEL_NONE or FALSE
=====================================================*/
panel = Glui->add_panel( "" ,GLUI_PANEL_NONE);
/*=====================================================
Add a button to the panel, with a label for the button,
a variable, and the callback function to handle the
button click
=====================================================*/
Glui->add_button_to_panel( panel, "Reset", RESET,
(GLUI_Update_CB) Buttons );
Glui->add_column_to_panel( panel, FALSE );
Glui->add_button_to_panel( panel, "Quit", QUIT, (GLUI_Update_CB)
Buttons );
/* tell glui what graphics
window it needs to post a redisplay to: */
Glui->set_main_gfx_window( GrWindow );
/* set the graphics window's idle
function: */
GLUI_Master.set_glutIdleFunc( Animate );
}
|
11) Our good old friend the keyboard callback. This works the
same way that the keyboard callback worked for project 2, basically a big switch
statement executes some function if a key which is pressed is defined. Otherwise
is does not do anything.
|
/**
** the keyboard callback:
**/
void
Keyboard( unsigned char c, int x, int y )
{
if( Debug )
fprintf( stderr, "DoKeyboard: '%c' (0x%0x)\n", c, c );
switch( c )
{
case 'q':
case 'Q':
case ESCAPE:
Buttons( QUIT ); /* will not return here -
you quit the program by executing this call*/
break;
default:
fprintf( stderr, "Don't know what to do with keyboard hit:: '%c'
(0x%0x)\n", c, c );
}
/*=======================================================
synchronize the GLUI display with
the variables:
use this to keep what the GLUI interface
displays
and what is current for the variables
they are associated with
the same
========================================================*/
Glui->sync_live(); /* force a call to Display():
*/
/* ======================================================
Makes the window 'GrWindow' the current
window, and post a redisplay
(ie call the display function). This
serves to update the image display. Otherwise
you would click and see the button
change, but nothing would change in the animation
=======================================================*/
glutSetWindow( GrWindow );
glutPostRedisplay();
}
|
12)
|
/**
** called when the mouse button transitions down or up:
**/
void
MouseButton
(
int button, /* GLUT_*_BUTTON */
int state, /* GLUT_UP or GLUT_DOWN */
int x, int y /* where mouse was when button hit
*/
)
{
int b; /* LEFT, MIDDLE, or
RIGHT */
if( Debug )
fprintf( stderr, "MouseButton: %d, %d, %d, %d\n", button,
state, x, y );
/* get the proper button bit mask: */
switch( button )
{
case GLUT_LEFT_BUTTON:
b = LEFT; break;
case GLUT_MIDDLE_BUTTON:
b = MIDDLE; break;
case GLUT_RIGHT_BUTTON:
b = RIGHT; break;
default:
b = 0;
fprintf( stderr, "Unknown mouse button: %d\n", button );
}
/* button down sets the bit, up
clears the bit: */
if( state == GLUT_DOWN )
{
Xmouse = x;
Ymouse = y;
ActiveButton |= b; /* set the proper bit */
}
else
ActiveButton &= ~b; /* clear the proper
bit */
}
|
13) If the mouse moves while a button is down, ie you click
and slide the mouse right without letting the mouse button up, we will rotate
the scene or scale it, depending on the mouse button currently pressed.
|
/**
** called when the mouse moves while a button is down:
**/
void
MouseMotion
(
int x, int y /* mouse coordinates, passed in by
GLUT*/
)
{
int dx, dy; /* change in mouse coordinates */
if( Debug )
fprintf( stderr, "MouseMotion: %d, %d\n", x, y );
dx = x - Xmouse; /* change
in mouse coords */
dy = y - Ymouse;
/*====================================
If the button which is down is the
left button, rotate the
scene in realtime
=====================================*/
if( ActiveButton & LEFT )
{
Xrot += ( ANGFACT*dy );
Yrot += ( ANGFACT*dx );
}
/*====================================
If the button which is down is the
middle button, scale the
scene in realtime
=====================================*/
if( ActiveButton & MIDDLE )
{
Scale += SCLFACT * (float) ( dx - dy );
/* keep object from turning inside-out
or disappearing: */
if( Scale < MINSCALE )
Scale = MINSCALE;
}
Xmouse = x; /* new current
position */
Ymouse = y;
glutSetWindow( GrWindow );
glutPostRedisplay();
}
|
14)The reset function is responsible for initializing various
variables. We call this in main as an initializing function, and whenever the
reset button is pressed. You may need to add variables or change some of these
values as you complete your program.
|
/**=====================================
** reset the transformations, and other variables:
**
** this only sets the global variables (initializes them)--
** the glut main loop is responsible for redrawing the scene
*=======================================*/
void
Reset( void )
{
ActiveButton = 0;
Debug = GLUIFALSE;
Scale = 0.3f;
Scale2 = 0.0f; /* because add 1. to it in Display() */
WhichProjection = PERSP;
Xrot = -80.;
Yrot = 30.;
TransXYZ[0] = TransXYZ[1] = TransXYZ[2] = 0.;
RotMatrix[0][1] = RotMatrix[0][2] = RotMatrix[0][3] = 0.;
RotMatrix[1][0] = RotMatrix[1][2] = RotMatrix[1][3] = 0.;
RotMatrix[2][0] = RotMatrix[2][1] = RotMatrix[2][3] = 0.;
RotMatrix[3][0] = RotMatrix[3][1] = RotMatrix[3][3] = 0.;
RotMatrix[0][0] = RotMatrix[1][1] = RotMatrix[2][2] = RotMatrix[3][3]
= 1.;
X = 0.;
Y = 0.;
Z = 6.;
Thetax = 0.;
Thetay = 0.;
Thetaz = 0.;
linear_Velocity[0] = 2.0f;
linear_Velocity[1] = 0.0f;
linear_Velocity[2] = 6.0f;
angular_Velocity[0] = 0.2f;
angular_Velocity[1] = 0.1f;
angular_Velocity[2] = 1.0f;
t=0;
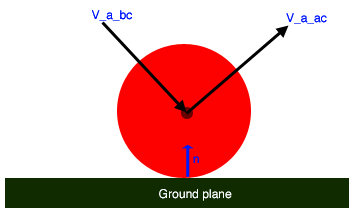
/* for a sphere, the collision normal will always
be perpendicular to the collision surface (flat ground plane here)*/
collision_normal[0] = 0.;
collision_normal[1] = 0.;
collision_normal[2] = 1.;
STOPPED = FALSE;
MOTION = 1;
/* find the inertia for the ball*/
Ia=.225*mass;
one_over_mass = 1./mass; /*Faster to compute
this once*/
g_radius = 0.5f;
glutSetWindow( GrWindow );
glutPostRedisplay();
}
|
15)We are not using this function for this homework, since
most of the resizing is taken care of in display, and there are some issues
when redrawing the scene, however keep this handy (ie put it in place) for the
part B of this project.
|
/*============================*
** called when user resizes the window:
*=============================*/
void
Resize( int width, int height )
{
if( Debug )
fprintf( stderr, "ReSize: %d, %d\n", width, height );
/*============================================================
don't really need to do anything since window size is */
/* checked each time in Display(), however if you want to
optimize your code you could do resizing here...
plus we'll be using this in the
next homework, so better to start the
structure now.
==============================================================*/
glutSetWindow( GrWindow );
glutPostRedisplay();
}
|
16)You are given the functions for performing dot products,
cross products, normalizing, finding the distance between two points, and finding
a scalar multiplication result. Aren't we nice?
|
float
dot( float v1[3], float v2[3] )
{
return( v1[0]*v2[0] + v1[1]*v2[1] + v1[2]*v2[2] );
}
void
scalarproduct(float v1[3], float c,float tmp[3])
{
tmp[0] = v1[0]*c;
tmp[1] = v1[1]*c;
tmp[2] = v1[2]*c;
}
void
cross( float v1[3], float v2[3], float vout[3] )
{
float tmp[3];
tmp[0] = v1[1]*v2[2] - v2[1]*v1[2];
tmp[1] = v2[0]*v1[2] - v1[0]*v2[2];
tmp[2] = v1[0]*v2[1] - v2[0]*v1[1];
vout[0] = tmp[0];
vout[1] = tmp[1];
vout[2] = tmp[2];
}
float
unit( float vin[3], float vout[3] )
{
float dist, f ;
dist = vin[0]*vin[0] + vin[1]*vin[1] + vin[2]*vin[2];
if( dist > 0.0 )
{
dist = sqrt( dist );
f = 1. / dist;
vout[0] = f * vin[0];
vout[1] = f * vin[1];
vout[2] = f * vin[2];
}
else
{
vout[0] = vin[0];
vout[1] = vin[1];
vout[2] = vin[2];
}
return( dist );
}
float norm(float n[3])
{
//computes a two norm of the input vector
return(sqrt(SQR(n[0]) + SQR(n[1]) + SQR(n[2]) ));
}
float distance(float v1[3],float v2[3])
{
return(sqrt(SQR(v1[0]-v2[0]) + SQR(v1[1]-v2[1]) + SQR(v1[2]-v2[2]) ));
}
|
17)A simple timer glut callback function. This will send a
flag (ie change a variable) to tell our program when to animate, thus keeping
a steady 30fps maximum. There are also ways of dropping frames if the computer
a program is run on is too slow to keep up with 30fps, but that is left for
discussion and the interested programmer.
|
void myTimer(int timevalue)
{
if(Debug)
fprintf( stderr, "mytimer\n" );
/*Do something here...perhaps,
a suggestion would be to change a variable as an indicator of when to
draw?*/
/*glut does something funny here.
You have to include in your function the following line of code to reset
the timer each time the timer goes off - like an alarm clock which switches
off after the alarm occurs, and must be turned on again*/
glutTimerFunc(33,myTimer,1);
}
|
18)Collision code will be for you to fill in. In this case
we are only checking for collision with one surface - the ground plane, so you
can just compare to see if the edge of the sphere has come close to the ground
( z=0 ). Additionally, since we lose energy each time there is a collision,
one has to check to see if the ball is bouncing such a small amount that we
consider it to be at rest. Otherwise you get a very unpleasant looking 'jiggle,'
and possibly the ball sinking through the ground when the velocity variable
is filled with an odd value.
Another key addition here is to add a check to see if the ball
is for some reason passing through the ground, and if so, reset it to being
above ground where physics says it should be (though there is a very very very
slight chance that statistically all repulsions simultaneously do not occur
and the ball slips through the ground, but that would be VERY star-trek-esque).
All-in-all this should be a relatively short routine, so if
you start having 50 lines of code, step away for a moment and consider that
there is a MUCH easier way to accomplish this task.
|
//this checks if the sphere collides
with any surface
int CheckCollision(float x,float y, float z)
{
/*You may please add your collision checking code
here!*/
return(0);
}
|
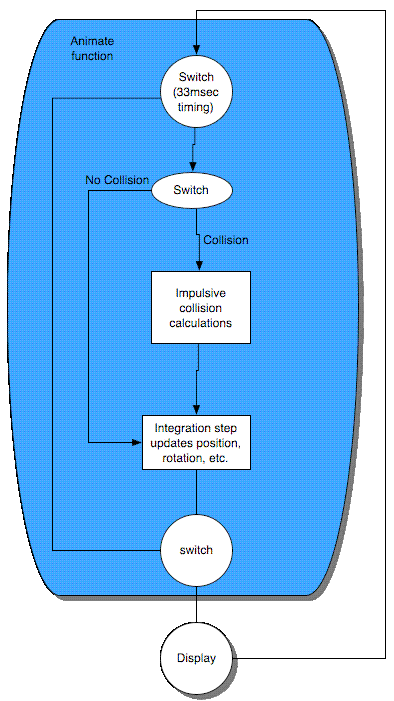
19)Probably the most important function of all in this project
- the animate routine! Don't worry, lots of help here will be given. This is
where you will include the calculations of impulse if a collision occurred.
This is also where you will include the movement update steps for when no collision
occurred. Ultimately this is a function to update the values for position and
velocity after each timestep. The flow of the function should be as follows:
|
|
Impulse equation:

Post collision linear velocity:
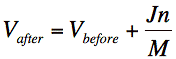
Relative velocities (ground is Vb = 0):
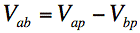
Relative normal velocity:

Impulse magnitude:

Steps to calculating new velocity change by impulsive collision
(no rotation):
1)calculate the impulse numerator (remember
that V and n are vectors)
2)calculate the impulse denominator (n
is a vector, M is a scalar)
3) impulse = impulse_numerator / impulse_denominator
4) linear_Velocity = linear_Velocity +
impulse/mass * collision_normal . You do not need to store the linear
velocities in big arrays, just calculate for each direction component
of the vector (x,y,z).
|
|
/**========================================
** this is where one would put code that is to be called
** everytime the glut main loop has nothing to do
**
** this is typically where animation parameters are set
**
** do not call Display() from here -- let glutMainLoop() do it
*=========================================*/
void
Animate( void )
{
/* put animation stuff in here -- change some global
variables */
/* for Display() to find: */
if (MOTION)
{
MOTION = 0;
Collide = CheckCollision(X,Y,Z);
if (!STOPPED)
{
if (Debug)
{
// fprintf(stderr,"collide is %d %d\n",Collide,
computed_collision);
}
if (Collide && (computed_collision ==
FALSE))
{
computed_collision=TRUE;
double impulse_numerator = -(1+COEFFICIENT_OF_RESTITUTION)*dot(linear_Velocity,collision_normal);
if( Debug )
{
fprintf(stderr, "Collision!\n");
fprintf(stderr, "Impulse numerator is %f\n",impulse_numerator);
}
//normal_times_one_over_mass[0] = collision_normal[0]*one_over_mass;
//normal_times_one_over_mass[1] = ..;
//normal_times_one_over_mass[2] = ..;
//impulse_denominator = ???;
//impulse = ???
//TA DA, new linear velocity! That wasn't
so bad, was it?
/* notice the linear velocity only changes
normal to the bounce (recall we have a frictionless surface, so
only normal forces are transmitted - all other components of the
collision normal are zero). We keep these other equations for possible
changes in the future...hint-hint*/
// linear_Velocity[0] = linear_Velocity[0]
+ ???;
// linear_Velocity[1] = linear_Velocity[1] + ???;
//linear_Velocity[2] =
linear_Velocity[2] + ????;
//now to compute angular velocity?...(extra
credit, see Extra credit section)
computed_collision = TRUE;
}
//now we'll add gravity to the mix!
t+=0.033f;
float dt=0.033f;
linear_Velocity[2]=linear_Velocity[2]-GRAVITY*dt;
//Now we'll do the equation updating...position
and velocity
X = X + dt * ( linear_Velocity[0] );
//Y=..;
//Z=..;
if (Z<g_radius)
/*Then what? How do we assure Z> the radius
of the sphere?*/
/*Continue rotating at the
same speed*/
Thetax = Thetax + dt * ( angular_Velocity[0] );
//Thetay =..;
//Thetaz = ..;
}
}
/* force a call to Display() next
time it is convenient: */
glutSetWindow( GrWindow );
glutPostRedisplay();
}
|
20) Easy parcheezy, the buttons routine works almost the same
way as the keyboard routine. Now you have the variable ID of the button which
was pressed passed into the function. Then you have a switch statement which
controls what the button does when pressed. You need one line in the reset button
case, and quit is taken care of for you. There may be other buttons you created,
so just add cases for their ID's. As you create buttons, be sure to define new
ID's for each one, like RESET. Don't leave out the glui->synclive(); call
at the bottom to update the GUI elements.
|
/*===================*
** glui buttons callback:
*====================*/
void
Buttons( int id )
{
switch( id )
{
case RESET:
// something must happen here ... perhaps a
mysterious function call...if I could only remember the name...?
break;
case QUIT:
/* gracefully close the
glui window: */
/* gracefully close out the graphics: */
/* gracefully close the graphics window: */
/* gracefully exit the program: */
Glui->close();
glFinish();
glutDestroyWindow( GrWindow );
exit( 0 );
}
Glui->sync_live();
}
|
21) Another key function. The display callback. This will be
called quite frequently. Here you will draw your objects at the scene position
and orientation, and the object positions and orientations. Much of the display
setup is here already, you just need to add your object code down below. Recall
from lecture about the order of transformation (the spinning triangles example
- download the example from the web page to understand order of operations on
matrix transformations).
|
/*============================*
** draw the complete scene:
*============================*/
void
Display( void )
{
int dx, dy, d; /* viewport dimensions */
int xl, yb; /* lower-left corner of viewport */
float scale2; /* real glui scale factor */
if( Debug )
{
fprintf( stderr, "Display\n" );
}
/* set which window we want
to do the graphics into: */
glutSetWindow( GrWindow );
/* erase the background: */
glDrawBuffer( GL_BACK );
glClear( GL_COLOR_BUFFER_BIT | GL_DEPTH_BUFFER_BIT );
glEnable( GL_DEPTH_TEST );
/* specify shading to be
smooth: */
glShadeModel( GL_SMOOTH );
/* set the viewport to a square
centered in the window, basically doing the resize functions here: */
dx = glutGet( GLUT_WINDOW_WIDTH );
dy = glutGet( GLUT_WINDOW_HEIGHT );
d = dx < dy ? dx : dy; /* minimum dimension
*/
xl = ( dx - d ) / 2;
yb = ( dy - d ) / 2;
glViewport( xl, yb, d, d );
/* set the viewing volume: */
/* remember that the eye is at the
origin looking in -Z */
/* remember that the Z values are actually */
/* given as DISTANCES IN FRONT OF THE EYE */
glMatrixMode( GL_PROJECTION );
glLoadIdentity();
if( WhichProjection == ORTHO )
glOrtho( -3., 3., -3., 3., 0.1, 1000. );
else
gluPerspective( 90., 1., 0.1, 1000. );
/* place the object into the viewing volume: */
glMatrixMode( GL_MODELVIEW );
glLoadIdentity();
gluLookAt( 0., 0., 3., 0., 0., 0., 0., 1., 0. );
/* rotate the scene: */
glRotatef( Yrot, 0., 1., 0. );
glRotatef( Xrot, 1., 0., 0. );
glMultMatrixf( (const GLfloat *) RotMatrix );
/* scale the scene: */
glScalef( Scale, Scale, Scale );
scale2 = 1. + Scale2; /* because glui translation
starts at 0. */
if( scale2 < MINSCALE )
scale2 = MINSCALE;
glScalef( scale2, scale2, scale2 ); /*
possibly draw the axes: */
/* translate the object: */
/* note the minus sign on
the z value */
/* this is to make the appearance of the glui z translate */
/* widget more intuitively match the translate behavior */
glTranslatef( TransXYZ[0], TransXYZ[1], -TransXYZ[2] );
//put your display code here!
/* swap the double-buffered framebuffers: */
glutSwapBuffers();
/* be sure the graphics buffer has
been sent: */
glFlush();
}
|
End of homework. Good luck, see you in the
lab...
I hope this is an educational project which
you leave having gained something meaningful.
Alex
Extra Credit (20 pts) - POSTPONED UNTIL
NEXT WEEK'S PROGRAM IS DUE! YOU WILL BE ABLE TO GET 40PTS EXTRA CREDIT ON NEXT
PROGRAM!!!
1) Modify your code so the user can click a check
box to include friction, and thus rotation as part of the physics in the simulation.
There are more equations which need to be considered with this. The impulse
will no longer be only applied to the linear velocity, but also to the angular
velocity.
Grading
| A compilable program which creates a window with your user name at the
title |
30pts |
| A glui window with all controls drawing properly |
20 pts |
| Animation works and is timed correctly |
20 pts |
| Collision works and is timed correctly |
10 pts |
| Controls all function according to requirements |
10 pts |
| view is zoomable, rotatable, translatable, etc. |
10 pts |
| Extra Credit |
20 pts |
| POTENTIAL TOTAL |
120pts |